It's good to know which users are not in the office. For example, you are…
How to Restore Exchange Server mailbox database
The Exchange Server crashed, and it can’t boot anymore. We want to mount the mailbox database on a second Exchange server. Unfortunately, there is no button to mount the mailbox database. In this article, you will learn how to restore an Exchange Server mailbox database without any data loss.
Introduction
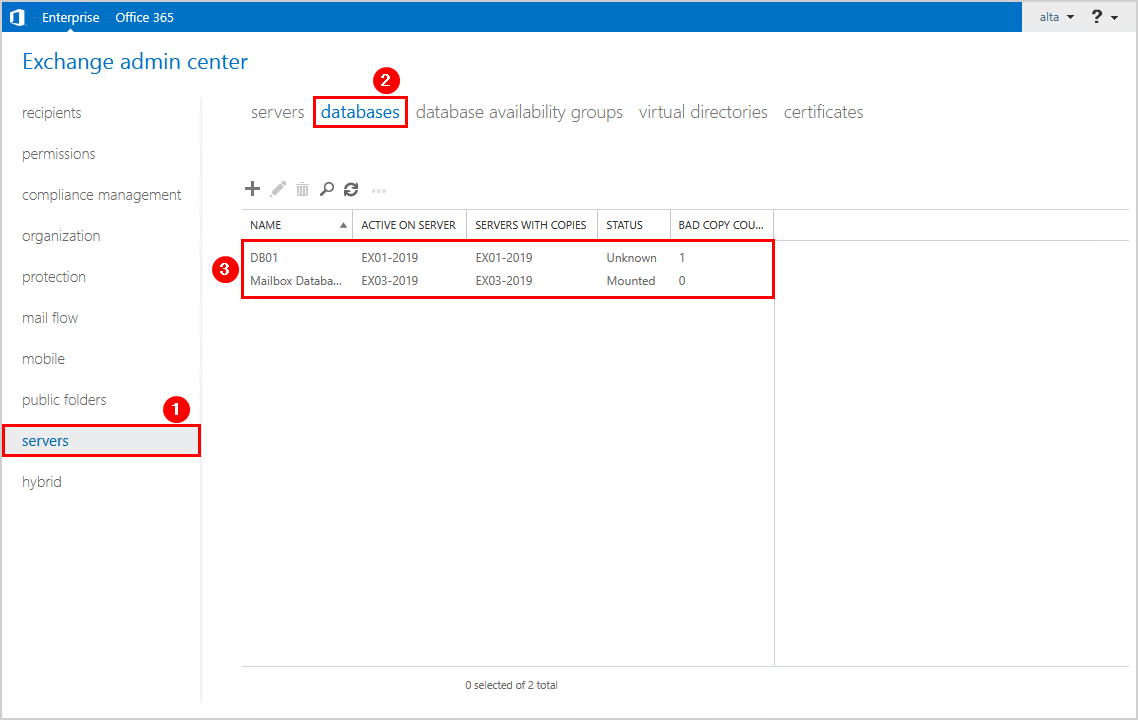
We have a failed Exchange Server 2019 (EX01-2019) that can’t boot anymore and a stable Exchange Server 2019 (EX03-2019).
There are two mailbox databases:
- The mailbox database DB01 is the only mailbox database that was in use on EX01-2019. Unfortunately, now that EX01-2019 is offline, the database mailbox mount status is Unknown (Offline), and nothing works.
- The mailbox database Mailbox Database is mounted to EX03-2019 and not in use. It’s in good health.
So how will we restore the Exchange mailbox database to the new Exchange Server EX03-2019?
Restore Exchange mailbox database to new server
We have the mailbox database DB01 (.edb) file. But how do we mount the mailbox database (.edb) file to the new Exchange Server? There is no option to mount the database from a file path in Exchange admin center or with PowerShell.
The Exchange Server has a feature called Database Portability. This allows a mailbox database from one mailbox server to be moved and mounted on another mailbox server within the same organization.
Important: When using database portability to recover a mailbox database, the operating system version and the Exchange Server version on the source and target Exchange servers must be the same. For example, if an Exchange 2016 mailbox database was previously mounted on a server running Windows Server 2016, database portability will only work when migrating the database to a server also running Windows Server 2016 and Exchange 2016.
Step 1. Get source mailbox database shutdown state
We have to check the database shutdown state to decide what the next step will be.
Start Command Prompt and run the below command.
eseutil /mh "C:\Backup\DB01\DB01.edb"You can also run the below command to only show the State property.
eseutil /mh "C:\Backup\DB01\DB01.edb" | findstr "State:"The output will show the value Clean Shutdown or a Dirty Shutdown.
State: Clean ShutdownStep 2. Perform soft recovery of source mailbox database
If the mailbox database is in a Clean Shutdown state or you don’t have the transaction logs, you can skip this step.
With a database in a dirty shutdown state, and all of the transaction log files available, perform a soft recovery of the database. This commits any uncommitted transaction logs into the database so that there is no data loss.
Run the below command in Command Prompt to perform a soft recovery on the mailbox database.
- /r: log prefix
- /l: path to log files
- /d: path to database file
- /s: path to checkpoint file
eseutil /r E00 /l "C:\Backup\DB01 Logs" /d "C:\Backup\DB01" /s "C:\Backup\DB01 Logs"The below output appears.
Extensible Storage Engine Utilities for Microsoft(R) Exchange Server
Version 15.02
Copyright (C) Microsoft Corporation. All Rights Reserved.

Initiating RECOVERY mode...
    Logfile base name: E00
            Log files: C:\Backup\DB01 Logs
         System files: C:\Backup\DB01 Logs
   Database Directory: C:\Backup\DB01

Performing soft recovery...
                      Restore Status (% complete)

          0    10   20   30   40   50   60   70   80   90  100
          |----|----|----|----|----|----|----|----|----|----|
          ...................................................


Operation completed successfully in 3.78 seconds.
Step 3. Create target mailbox database
Run Exchange Management Shell as administrator. Create a new mailbox database on the Exchange Server that you will use to mount the database. Specify the paths for the database file and the transaction logs.
Note: It will create the folders in the paths, but the mailbox database file or database logs will not appear there. It will only appear when you mount the mailbox database. However, you will not mount the database now because you need to replace it with the backup in one of the next steps.
New-MailboxDatabase -Name "DB01-Recovered" -Server "EX03-2019" -EdbFilePath "E:\DB01-Recovered\DB01.edb" -LogFolderPath "F:\DB01-Recovered"The below output appears.
Name                           Server          Recovery        ReplicationType
----                           ------          --------        ---------------
DB01-Recovered                 EX03-2019       False           None
WARNING: Please restart the Microsoft Exchange Information Store service on server EX03-2019 after adding new mailbox
databases.
Mark the database as overwritable. The -AllowFileRestore parameter specifies whether to allow a database to be restored from a backup.
Set-MailboxDatabase "DB01-Recovered" -AllowFileRestore:$trueImportant: Do not mount the mailbox database. First, you have to move the source mailbox database files.
Step 4. Move source mailbox database and log files
Get the mailbox database from the backup or the non-booting Exchange Server.
Move the source mailbox database and the log files to the target paths you created in the previous step.
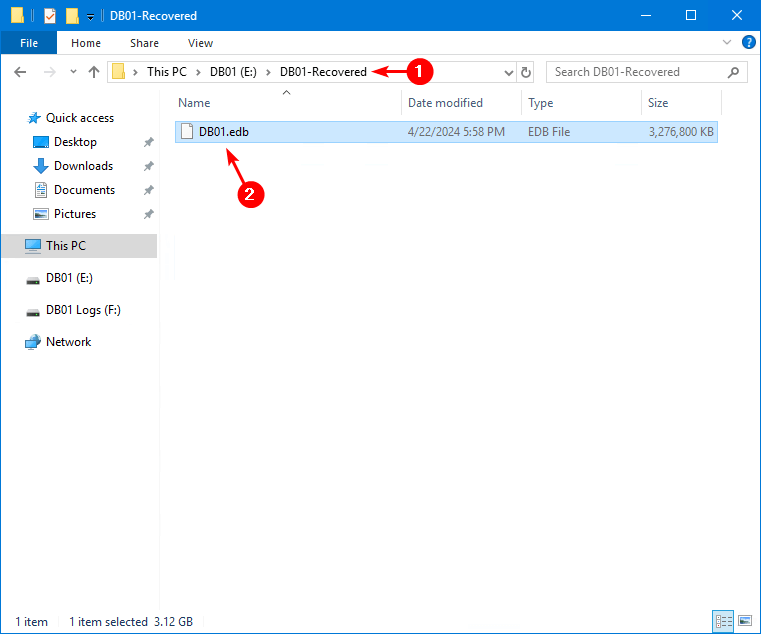
Copy the mailbox database DB01.edb.
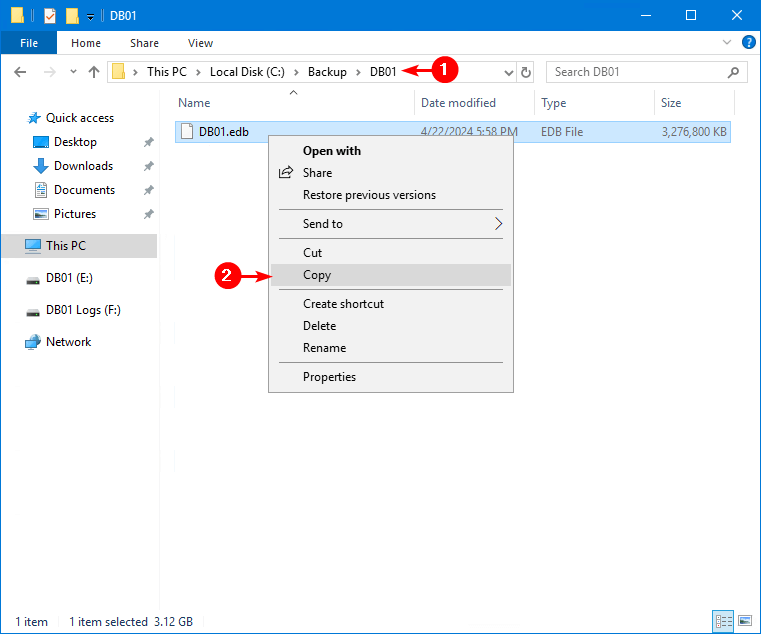
Paste it in the path E:\DB01-Recovered on EX03-2019.
Copy the mailbox database DB01 logs. If you don’t have the mailbox database transaction logs, you can skip this step.
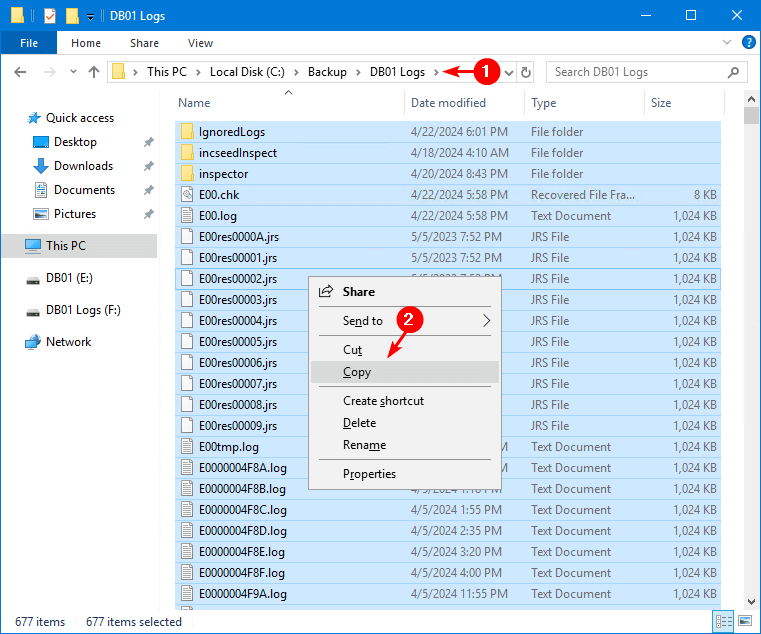
Paste it in the path F:\DB01-Recovered.

Step 5. Mount target database
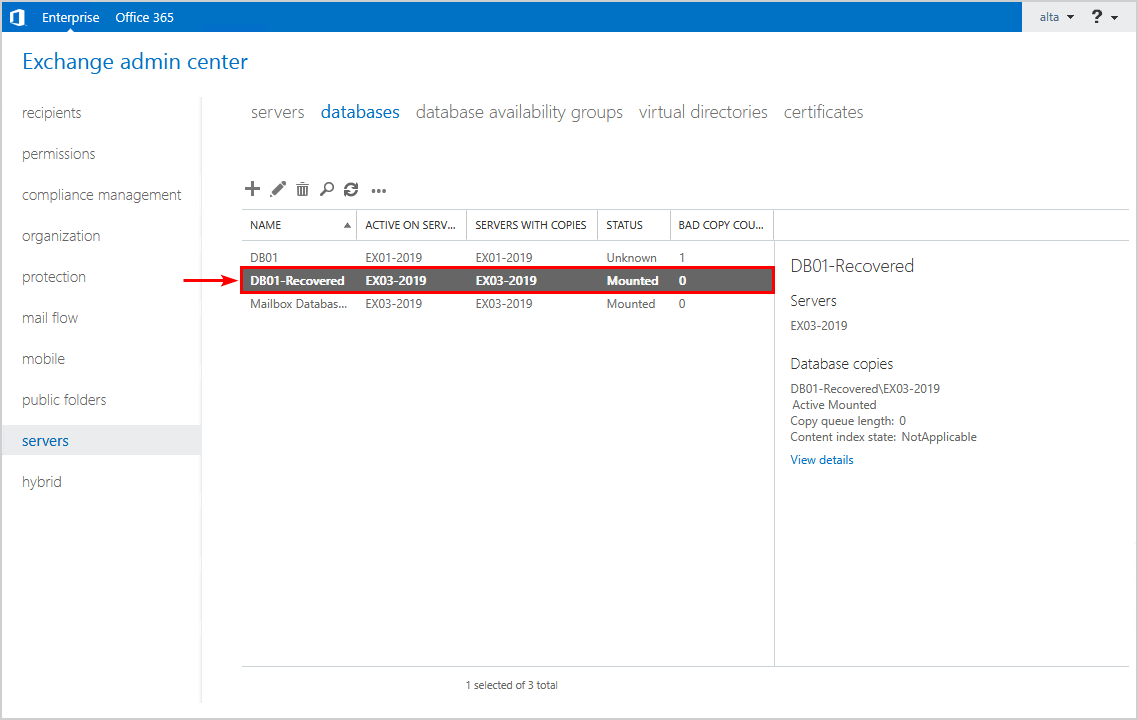
Mount the database DB01-Recovered.
Mount-Database "DB01-Recovered"Verify that you see the mailbox database DB01-Recovered as mounted in Exchange admin center.
Step 6. Set mailbox database on users
Let’s rehome the mailboxes from DB01 to the DB01-Recovered.
Get the mailboxes on database DB01.
Get-Mailbox -Database "DB01" -ResultSize UnlimitedIt shows the users that they are connected to EX01-2019, which is completely normal.
Name                      Alias                ServerName       ProhibitSendQuota
----                      -----                ----------       -----------------
Administrator             Administrator        ex01-2019        Unlimited
Max Fraser                Max.Fraser           ex01-2019        Unlimited
Richard Hunter            Richard.Hunter       ex01-2019        Unlimited
Boris Campbell            Boris.Campbell       ex01-2019        Unlimited
Alysia Maverick           Alysia.Maverick      ex01-2019        Unlimited
Christopher Payne         Christopher.Payne    ex01-2019        Unlimited
Nicholas Murray           Nicholas.Murray      ex01-2019        Unlimited
James Paterson            James.Paterson       ex01-2019        Unlimited
sharedmailboxonprem       sharedmailboxonprem  ex01-2019        Unlimited
You must set the mailbox to the new database name DB01-Recovered.
Change the mailbox database for a single user. This will set the attributes to the mailbox database DB01-Recovered and automatically set the server name EX03-2019 too.
Set-Mailbox -Identity "Boris.Campbell" -Database "DB01-Recovered" -ForceSet it for all the users.
Get-Mailbox -Database "DB01" -ResultSize Unlimited | Set-Mailbox -Database "DB01-Recovered" -ForceIf the environment has issues, the Get-Mailbox cmdlet will not show the mailboxes. So, you need to use the Get-ADUser cmdlet instead.
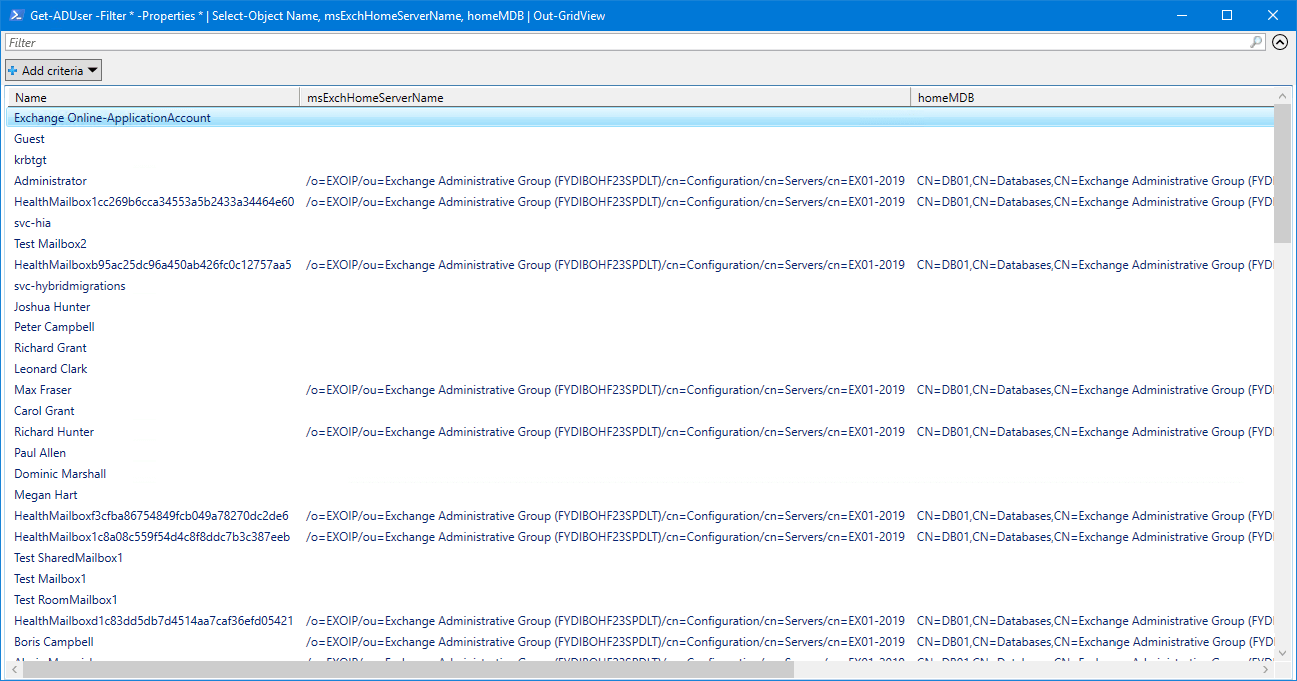
Get-ADUser -Filter * -Properties msExchHomeServerName, homeMDB | Select-Object Name, msExchHomeServerName, homeMDB | Sort-Object Name | Out-GridViewThis will show all the users.
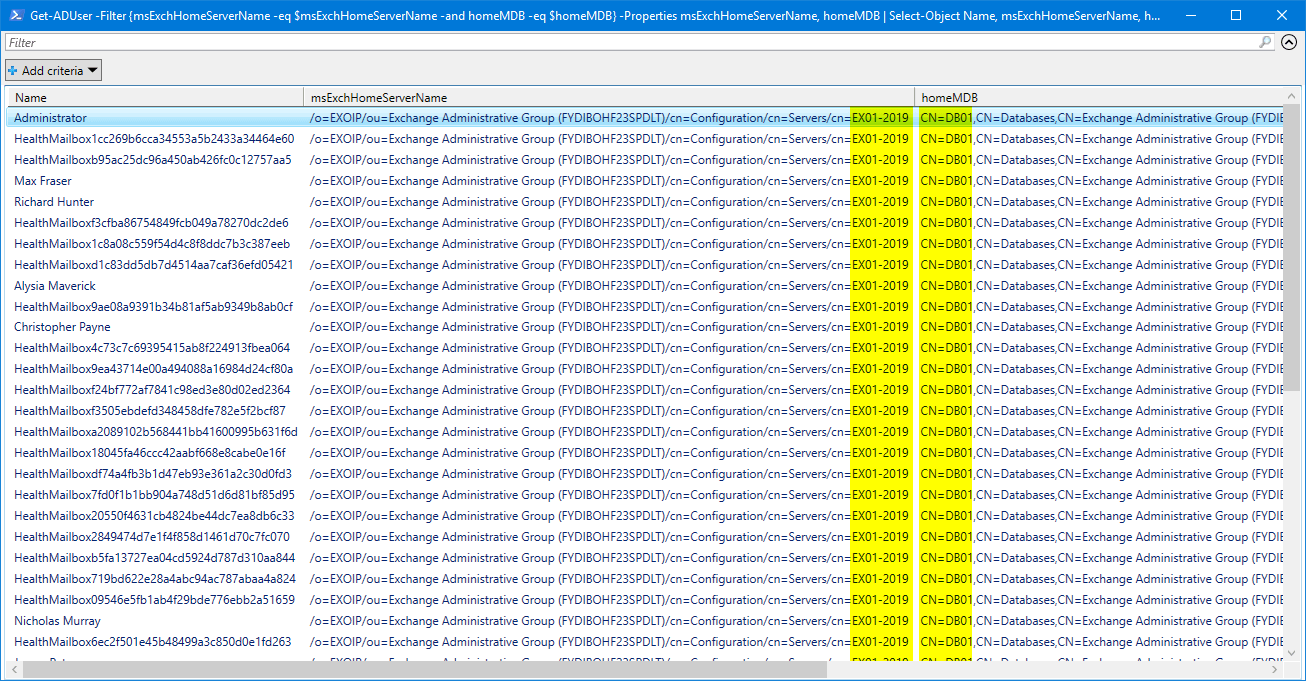
Not all the users have a mailbox, and they can be in different databases. So let’s filter only on the users from Exchange Server EX01-2019 and mailbox database DB01.
# Define variables
$msExchHomeServerName = "/o=EXOIP/ou=Exchange Administrative Group (FYDIBOHF23SPDLT)/cn=Configuration/cn=Servers/cn=EX01-2019"
$homeMDB = "CN=DB01,CN=Databases,CN=Exchange Administrative Group (FYDIBOHF23SPDLT),CN=Administrative Groups,CN=EXOIP,CN=Microsoft Exchange,CN=Services,CN=Configuration,DC=exoip,DC=local"

# Get users matching the specified criteria
Get-ADUser -Filter {msExchHomeServerName -eq $msExchHomeServerName -and homeMDB -eq $homeMDB} -Properties msExchHomeServerName, homeMDB | Select-Object Name, msExchHomeServerName, homeMDB | Sort-Object Name | Out-GridView
This is how the output looks.
Let’s set the new mailbox database DB01-Recovered for all the filtered users.
# Define variables
$msExchHomeServerName = "/o=EXOIP/ou=Exchange Administrative Group (FYDIBOHF23SPDLT)/cn=Configuration/cn=Servers/cn=EX01-2019"
$homeMDB = "CN=DB01,CN=Databases,CN=Exchange Administrative Group (FYDIBOHF23SPDLT),CN=Administrative Groups,CN=EXOIP,CN=Microsoft Exchange,CN=Services,CN=Configuration,DC=exoip,DC=local"

# Get users matching the specified criteria
$users = Get-ADUser -Filter {msExchHomeServerName -eq $msExchHomeServerName -and homeMDB -eq $homeMDB} -Properties SamAccountName, msExchHomeServerName, homeMDB

# Iterate through each user and set the mailbox database
foreach ($user in $users) {
    Set-Mailbox -Identity $user.SamAccountName -Database "DB01-Recovered" -Force
    Write-Host "Mailbox database set for user $($user.SamAccountName)" -ForegroundColor Green
}
The above commands only rehomed the mailboxes and not the archive mailboxes. To rehome the archive mailboxes, you must change the msExchArchiveDatabaseLink attribute value.
Find the archive mailboxes that are on mailbox database DB01.
$msExchArchiveDatabaseLink = "CN=DB01,CN=Databases,CN=Exchange Administrative Group (FYDIBOHF23SPDLT),CN=Administrative Groups,CN=EXOIP,CN=Microsoft Exchange,CN=Services,CN=Configuration,DC=exoip,DC=local"

# Get users matching the specified criteria
Get-ADUser -Filter { msExchArchiveDatabaseLink -eq $msExchArchiveDatabaseLink } -Properties SamAccountName, msExchArchiveDatabaseLink, msExchHomeServerName | Select-Object Name, msExchArchiveDatabaseLink, msExchHomeServerName | Sort-Object Name | Out-GridView
Let’s set the new mailbox database DB01-Recovered for all the archive mailboxes.
# Define variable
$msExchArchiveDatabaseLink = "CN=DB01,CN=Databases,CN=Exchange Administrative Group (FYDIBOHF23SPDLT),CN=Administrative Groups,CN=EXOIP,CN=Microsoft Exchange,CN=Services,CN=Configuration,DC=exoip,DC=local"
$msExchArchiveDatabaseLinkNew = "CN=DB01-Recovered,CN=Databases,CN=Exchange Administrative Group (FYDIBOHF23SPDLT),CN=Administrative Groups,CN=EXOIP,CN=Microsoft Exchange,CN=Services,CN=Configuration,DC=exoip,DC=local"

# Get users matching the specified criteria
$users = Get-ADUser -Filter { msExchArchiveDatabaseLink -eq $msExchArchiveDatabaseLink } -Properties msExchArchiveDatabaseLink

# Update the msExchArchiveDatabaseLink attribute for each user
foreach ($user in $users) {
    Set-ADUser -Identity $user -Replace @{msExchArchiveDatabaseLink = $msExchArchiveDatabaseLinkNew }
    Write-Host "Mailbox database set for user $($user.SamAccountName)" -ForegroundColor Green
}
Step 7. Get mailbox on target database
Verify that the mailboxes are hosted in the mailbox database DB01-Recovered.
Get-Mailbox -ResultSize Unlimited -Database "DB01-Recovered"Get-Mailbox -ResultSize Unlimited | Where {$_.ArchiveDatabase -like "DB01-Recovered"}Check the database DB01 for mailboxes, and there will be no results.
Get-Mailbox -ResultSize Unlimited -Database "DB01" Get-Mailbox -ResultSize Unlimited | Where {$_.ArchiveDatabase -like "DB01"}What’s next?
The mailbox database DB01-Recovered is online, and everyone can connect to the Exchange Server and continue with their work.
You can now recover the EX01-2019 server. Follow one of the below articles to recover Exchange Server:
If you don’t use the /Mode:RecoverServer switch, as shown in both articles, you will install a new Exchange Server in the organization. While this is not the recommended method, it will work. However, you must remove the old Exchange Server from ADSI Edit and set up more post configurations on the Exchange Server.
That’s it!
Read more: Exchange Server health check with PowerShell script »
Conclusion
You learned how to restore the Exchange Server mailbox database. It’s always essential to have a backup of the mailbox database because that’s where all the mailbox information is stored. Follow the steps to mount the backed-up mailbox database to another Exchange Server.
Did you enjoy this article? You may also like Create user mailbox in Exchange Server. Don’t forget to follow us and share this article.
What Others Are Reading


This Post Has 0 Comments